Still following? Great. Let’s talk about Products.
LINKING PRODUCTS TO COST CENTERS
Products may be ordered/released in Ollie if they are linked to the User and their Cost Center.
Once again, if this Customer does not use Cost Centers, don’t worry about it too much; SAFE will simply assign each link to the Default Cost Center for the Customer. The important thing is that the User must be linked to the Product and this is done in the Product Master.
If you do use Cost Centers then you’ll need to assign each User to a list of Products they are allowed to order or release for each Cost Center.
SETTING UP PRODUCTS FOR EACH OLLIE ORDER TYPE
Releases
All Products linked to a Contact/User may be released by that User. That is, they will
automatically have the ability to enter a Release Transaction in Ollie using this Product. They will be allowed to release up to the Maximum Release Quantity you enter.
This defaults to the Maximum Release Quantity set in the Product Master, however it can be overridden for a particular User within a particular Cost Center.
Stocking Orders
However, every Product may not be ordered as a Stock Order transaction. For that, the link must have the Allow Stock Order box checked in the Linked Product Properties. They will be allowed to order up to the Maximum Order Quantity you enter.
This defaults to the Maximum Order Quantity set in the Product Master, however it can be overridden for a particular User within a particular Cost Center.
Imprint Orders
A Product Master also has a Spec Style. If a Spec Style is selected and an Imprint Template has
been created (as we’ll soon discuss), the Product will be available to order in the Ollie Imprint Order screen. In other words: if a Product has a particular Spec Style and an Imprint Template, Ollie assumes it is to be ordered as an Imprint Order and not via the Stock Ordering screen.
OTHER FIELDS IN THE PRODUCT MASTER
We’ve already discussed several fields that are used in Ollie orders, but it’s nice to put them all in one place:
| FIELD | PURPOSE | WHERE USED IN OLLIE |
| Release LeadTime | The amount of time the Product will take to fulfill once a Release has been submitted | Release screen |
| Release Std. Qty | The default quantity for a Product when releasing in Ollie. | Release screen |
| MaximumRelease Qty | Limits the User to a maximum quantity. This can be overridden per user in the Linked Products/Cost Centers browse. | Release screen |
| MinimumRelease Qty | You can also force users to release a minimum quantity. Again, this can be overridden per user in the Linked Products/Cost Centers browse. | Release screen |
| Order LeadTime | The amount of time the Product will take to fulfill once an Order has been submitted. | Stock Order screenImprint Order screen |
| Release Std. Qty | The default quantity for a Product when ordering in Ollie. | Stock Order screenImprint Order screen |
| Release U/M | The unit of measure | Release screen |
| MaximumOrder Qty | Limits the User to a maximum quantity. This can be overridden per user in the Linked Products/Cost Centers browse. | Stock Order screenImprint Order screen |
| MinimumOrder Qty | You can also force users to order a minimum quantity. Again, this can be overridden per user in the Linked Products/Cost Centers browse. | Stock Order screenImprint Order screen |
| Order U/M | The unit of measure | Stock Order screenImprint Order screen |
| Internal UseOnly | Prevents Products from displaying inOllie under any circumstances. | All |
| F/M Unit Price | The Unit Price users will see. | Release screen |
| Unit Price | The Unit Price users will see. | Stock Order screenImprint Order screen |
| Customer | Free text notes regarding the Product. | Release screenStock Order screen |
Imprint Order screenProducts screenShopping Cart
| Notes | ||
| CATEGORIES | These fields are used to classify yourProducts in various categories.(Duhh!)But if you like they can also be used, in conjunction with the ProductCategories table to create a heirarchy of Products from broad to more detailed with up to four levels of detailFor example: Checks Continuous A/PPayrollCut SheetExpense ReimbursementThe advantage of this system in Ollie is that you can make it easy for Users to search by drilling down from thewith Products in higher level allows you to further organize each Product ID. Useit for sorting or filtering records on reports and browses. Simple Accounting doesnot use this field for processing. Category fields are also used to makeselecting a Product easier in Ollie orWebSAFE. | Release screen Stock Order screen Imprint Order screen |
SPEC STYLES, WEB TEMPLATES AND PRODUCT IMPRINT TEMPLATES
Confused? Don’t worry just yet.
Web Templates
Ollie ships with a single default Web Template. The Web Template is the screen design you see
for Imprint Orders. This default template is the ‘kitchen sink’; it contains all sixteen possible fields which may be a part of any Imprint Order.
But certain Spec Styles can trigger different Web Templates, ie. different input screens depending on the product. For example, when users are ordering envelopes, you may want them to only see the address fields; other irrelevant fields such as ‘web address’ should be hidden to avoid confusion. So, a Web Template is installed which automatically switches to this shorter data input page when the user selects any envelope.
So, you may create several Web Templates to handle the types of Products you sell most. The following Spec Styles can each trigger an optional Web Template.
| TYPE | SPEC STYLE ID | SPECIAL NOTES |
| Advertising Specialties Business Cards EnvelopesLabelsLetterhead | A B E LD | Wearables. |
Note that these are optional. You must purchase Web Templates as needed. When there is no specific Web Template installed, Ollie always falls back to the default Web Template (ie. all fields.)
Web Imprints Provide Enhanced Data Validation
One other reason to install a Web Template is to enable data validation and formatting (as we’ll
discuss more in the Product Imprint Template section.) The Default Web Template contains no formatting or validation, ie. whatever the user types in is what they get. You may wish to provide them with assistance by forcing data to be entered according to specific rules, eg. Dates in
00/00/00 format, or phone numbers in (555).123.1234 format. If so, then you should have a Web
Template installed to enforce these rules.
Web Imprints Are Global
It is important to remember that Web Templates are global. For example, if you install an
Envelope Web Template, then all envelopes for all customers will use it’s screen and formatting rules.
Beyond Web Imprints
However, if you need tweaking based on customer or individual products, you can use the
Product Imprint Templates (described later) to customize the look of the data input on a per
Product basis.
So, to sum up…
1. You get the Default Web Template which appears for all Imprint Orders by.. er…
‘default’.
2. You can install individual Web Templates for each common Spec Style to provide a less cluttered data entry experience or to enforce data entry rules. These are global to all customers.
3. You can customize each Web Template by Product using the Product Imprint Templates in SAFE.
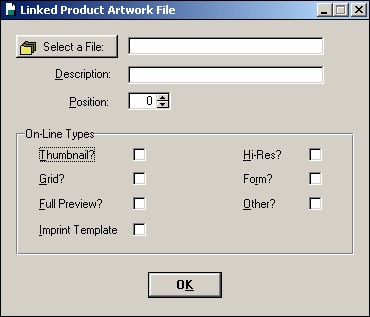
PRODUCT IMAGES
There are several types of images your Users will manipulate in Ollie which are related to the
Products they order/release.
Once a Product Image is uploaded to the appropriate folder on your Ollie Server, you still need to link the Product Master to the image. This is done in SAFE in the Linked Files window accessed by right clicking on the Products Browse.
| TYPE | ID | DESCRIPTION |
| ThumbnailsGridFull PreviewsPDF Imprint TemplatesHi-Res PDF FormsOther | TG FI HRO | These are small versions of images users see in various windows such as the Imprint Order Form screen. These can be in JPG or GIF format.These are the small images users see in various browse screens. These can be in JPG or GIF format.These are the larger images users see when they click on various browse screens to view an item in more detail. These can be in JPG, GIF or PNG format.These are the ‘form-fill’ documents in Adobe PDFformat which are used for Imprint Templates.These are optional high resolution versions of the’form-fill’ documents. These are sent to your manufacturers to product the final Imprint Order items.These are documents which you will allow Users to click on and download. These are typically Adobe Acrobat or Microsoft Word documents.Miscellaneous files which you will allow Users to click on and download. |
PRODUCT IMPRINT TEMPLATES
Products ordered from the Ollie Imprint Order screen utilize Custom Product Templates. A
custom product template provides the names and formatting for the form-fill fields on the Imprint Order screen for the given product. Since the number, description and formatting of these fields can be changed for each Product, the Imprint Order screen can accommodate virtually any kind of templated product.
Custom Template Setup
Product Templates are configured by opening the Spec screen for the Product and clicking on the
On-Line Template button. You then fill out the screen with the number of imprint lines required for the Product as follows:
# DESCRIPTION FORMATTING 1. NAME (none) 2. ADDRESS #1 (none) 3. ADDRESS #2 (none) 4. ADDRESS #3 MU 5. OFFICE PHONE # PH6. CELL PHONE # PH
Formatting Types
Note that in the FORMATTING column for field four we entered ‘MU’ and in fields five and six
we entered ‘PH’. These are examples of Formatting Options, a very powerful tool for:
· Enforcing proper data entry from your Users
· Generating the proper output for your PDF previews. These types may combined by simply separating them with a comma.
Be Careful! If you combine incompatible Formatting Types (eg. ‘Z’ and ‘D’) your Imprint Order screen may not work for that Product!
Here is a complete list of Formatting Options:
| TYPE | DESCRIPTION |
| PH | (999)999-9999×9999 |
| D | 99/99/9999 |
| ST | A drop down list of American States and Canadian Provinces. |
| Z | 99999-9999 |
| EX | (Expression) This actually requires a bit of explaining. This field actually will not be viewed on the Imprint Order Screen. It is used to |
| act as a ‘container’ for more complex forms of data; typically whereseveral entry fields need to be combined. A common example is CITY, STATE ZIP.Example: you are using line #6 for city, line #7 for state and line #8 for zip.In line #9 enter ‘EXPRESSION’ in the TYPE field and in theFORMATTING field enter “RTRIM(#IMPRINTLINE6#) & ‘,’ &#IMPRINTLINE7# & ‘ ‘ & #IMPRINTLINE8#”This will substitute the contents of lines 6,7 and 8 into line #9 when the preview is generated. | |
| MU | (Move Up) If this field is empty, substitute the field below for it. The most typical example is the case of formatting multiple address lines.Example: you are using line #3 for address 2 and line #4 for address3.In line #3 enter ‘MU’ in the TYPE fieldThis will substitute the contents of lines 3 with that of line 4 and leave line 4 blank. |
| MD | (Move Down) If this field is empty, substitute the field above for it. The most typical example is the case of formatting multiple address lines.Example: you are using line #3 for address 2 and line #4 for address3.In line #3 enter ‘MD’ in the TYPE fieldIf line #4 is empty, this will substitute the contents of line 4 with that of line 3 and leave line 3 blank. |
| ADDR1,CITY | Substitutes the contents of the field with a properly formatted concatenation of Address1, a comma, and then the City/State/Zip field.Example:You assign field #12 with ADDR1,CITY as the TYPE of formattingThe end user enters the following onto the imprint page:Address1: 1234 Main StreetCity State Zip: Royal Oak, MI, 48083In line #12 of the generated PDF, the following prints:
1234 Main Street, Royal Oak, MI 48083 |
| U | Force to upper case |
| L | Force to lower case |
| R | (Required) The User may not leave the field blank. |
Creating the Actual PDF Templates
The other step involved in setting up a product for an imprint order, requires creating the form-
filled Acrobat PDF documents. This procedure is described later in this document.